Showing posts with label Mexican art lesson. Show all posts

Thursday, February 23, 2017

In the Art Room: Folk Art Still Life Inspired by Kerri Ambrosino

 Next week, I'll be heading to the Big Apple for the NAEA convention (you can check out the dates/times/topics I'll be presenting and co-presenting here). In preparation, I've been working on my sub plans which, as you know, is always a really good time. Because I'll be presenting on folk art, I decided to base my sub plans around that theme. In particular, my students will be learning about the Mexican folk artist Kerri Ambrosino
I'm a sucker for color and pattern. I am using her work to also reteach the elements of art and introduce the principals of art. While I am gone, my students will tackle the first half of the sub plan video and we'll do the rest together when I return. Cuz there ain't no way those kids are using puffy paint without me! I'll be doing this lesson with all grades. When I create sub plan videos, I often do this because it is so much easier for the sub. They become experts at the lesson and don't feel flustered going from one lesson to the next, switching out visuals and supplies. A Happy Sub means Fewer Flubs! Here's the sub video. Feel free to use in your art teacherin' adventures:
Supplies needed:

* Popsicle sticks. I have ONE TRIZILLION popsicle sticks. I always get them donated and I never know what to do with them...until now. Of course, they aren't necessary for this project but they do add a fun three-dimensional element. 

* Matte board/cardboard. This will hold the weight of the sticks. I have a surplus of card and matte board as well so this was a good way to use that up. I cut it 4" X 7".

* Construction paper.  In various colors, also cut to 4" X 7" to serve as the background.

* Scrap papers. For the vase and flowers.

* Foam flowers. Again, another art room surplus. Let's use 'em up! They'll also add that fun third dimention.

* Puffy Paint!
 While I'm away, I hope that the students will get all of their sticks decorated and glued to their background. For my 30 minute classes, they might only get the sticks complete. For my hour long classes, they should have no problem knocking that out. We are also creating large scale flower still lives for teacher appreciation...so my early finishers start on that with their decorated strip for the table. 
 Kerri's work is just wonderful! I love everything about it and I think my students will as well. I'm excited about these small masterpieces. They'll make a great addition to our art show and the perfect presents for Mother's Day...which I know is far off but I always procrastinate. Not this time!
 I will be certain to share a follow-up blog post.
If you give this lesson a go, I'd love to know! Special thanks to my P.E. buddy Ali for working out the kinks of this project with me. 
 photo signature_zpsd10b3273.png
Read more »

Thursday, November 13, 2014

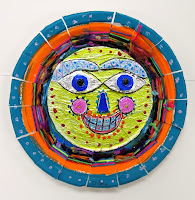
In the Art Room: Mexican Sun/Moon Weavings

You know, as an art teacher, I just can't seem to teach short and simple lessons. I ain't braggin'. It's a real problem. I mean, what you are looking at here took us 4 weeks of art class to complete (that'd be 4 hours). What with the metal relief, the coloring, the puffy painting, plate painting and weaving, I thought the entire thing would never end. However. Looking through the stacks of these masterpieces and reading the kid's artist statements about their work (as well as the sweet notes that my second grade kids wrote them about their artwork), I like to think it was all worth it. That being said, you had better believe our next project is gonna be, well, less than four weeks. Like, maybe three and a half.
So just how did this whole project come to be? Well, I go the idea for the metal design from Denise Logan in her book and on her website, she shares the lesson of creating a Mexican sun. I love her lesson but decided to take the process one step further by adding the woven edge. This is the same group of fourth graders that created these stitched creations. Their fingers were itching for more fibers arts so I thought, why not give the kids what they want?
The process for the sun/moon plate was much like the one my third grade students created for their dots. To begin the project, on our first day, we reviewed what we new about Mexico with this prezi. Then, I introduced the ceramic work of the artists in Metepec, Mexico with this prezi
After that intro, the kids were given this sketching sheet to hash out some ideas. I set my Time Timer for 7 minutes and told them to meet with me again when the timer went off. 
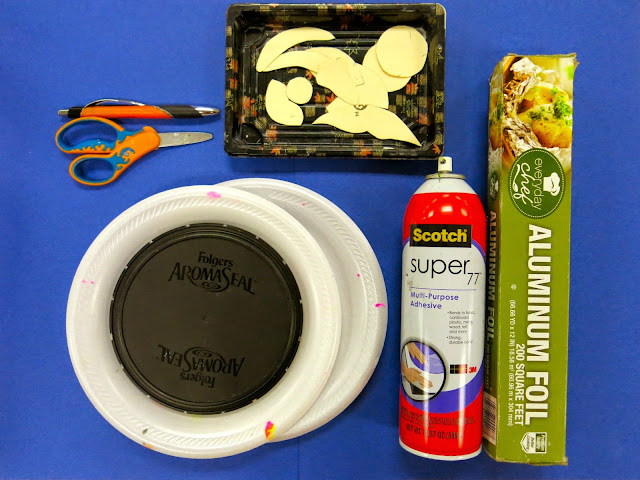
 By the way, here's a lil shopping list for you:

  • Cheapo Styro Plates. I mean the really cheap kind. Two for each kid.
  • Cheapo Foil.
  • Spray Glue. 3M's my jam.
  • Ink Pens. They work best on styro as they don't cut into it like pencils.
  • Face Template. Hate me if you wanna, we used facial parts to trace for those who didn't feel confident in drawing their own facial pieces.
  • Circle Temple. 

Once the timer went off, we met again to talk about how to make our sketch a reality. First step, cut out two circles. One will be for the face the other, the parts.
Trace template pieces or create your own template pieces on your sketch paper. Cut those out and trace around them. I discouraged the kids from sketching directly on the styro as they couldn't erase those lines.
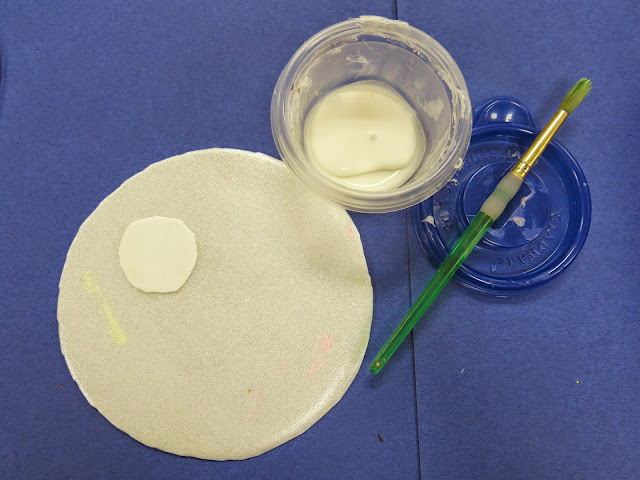
 Start gluing those pieces in place. By the way, I don't use glue bottles in my art room as they are the Root of All Evil (I remember the moment I saw a child attempt to use the blade of a brand new pair of scissors to unclog a bottle whilst another proceeded to bust off the tip of his pencil lead during his stabbing/unclogging attempt. Forever after that, it's been glue in a cup and paint it on.) 

This was about all we managed on that first day. Each kid was given an envelope to put their pieces in for the following art class.
 During our second art class, the kids finished cutting out and gluing pieces. The kids could decide if they wanted to make a sun, a moon or a combo of both. When they were finished, they came to see me at the Super Amazing Spray Glue Table where I spray glued their work and placed foil atop. IF they wanted a sun/moon, I sprayed their styro face and gave them yarn to lay on top however they wanted it.
Massage the plate but do not use your fingernails. That will tear the foil and make for a super sad art teacher. 
From there, color was added with Sharpie. Now, I did have to make one muy importante rule: The background of the face needs to be ONE color (unless it's a sun/moon). Here's why I did that: I noticed the kids were picking colors at random and they were losing the face completely. I told them that the raised pieces could be any color they wanted but that the background was to be one solid color. No one's creativity appeared to be crushed during the enforcement of that thar rule. 

Once coloring was complete, the kids entered Puffy Paint land. WHICH they loved, according to their artist statements. 
 During our next art class, the kids painted the outer edge of a large Chinet plate (I suppose if you wanted a shorter project, have the kids create smaller faces and use smaller Chinet plates? Just a thought). That only took them 15 minutes which gave them more time to finish their coloring and puffy painting from the previous class. I did have a couple early finishers who began our next project: Ojos de Dios!
 The following class, the paint had dried so the kids cut their plates and started weaving. I gave the kids a template with 19 notches cut into it. They laid the template on their plate, cut the notches and started to weave. I do a weaving project every year with my students so a quick reminder that weaving is over and under and they were off running.
Me: Oh my goodness, I love your sun/moon! Can I ask what's on her lip?

Student: She has one of those sores that I get in the winter.

Me: Um, like, a cold sore? 

Student: Yeah, that's it! I wanted her to have a cold sore.

(OMG, I die.)
Once the kids wrapped up their weaving, they were to write an artist statement. We chatted about how we could either write about the process, the product or something we learned. Once those were complete, they were glued to the back of the weavings. Reading those statements was hilariously enlightening.


So apparently the kids like puffy paint. I did have several kids write about something called "puppy paint". Um, what?! Do they think I'm so cruel that puppies were harmed in the making of said paint?! Guess we need to have a chat. OR I need to do a better job enunciating. 
My school district is joining in on a Be Nice Campaign. The kick off was this week. So I decided to have a weekly Give Nice a Try post in my art room. Sometimes we'll have time to give it a go in the art room...however, often times, I'll be counting on the kids to do this on their own time. This week, it worked out for my sweet second graders to write a nice note to the fourth grade about their finished pieces. 
Here are the second graders writing their nice notes to the fourth grade.
 
I double checked all notes before giving them out to the fourth grade. I wanted to be sure they were nice. This one was especially sweet.

The fourth graders were pretty stoked to get feedback about their artwork. I had them write thank-you notes to their new second grade friends. This note really showed the impact of our letter writing campaign. 
And there you have it! Even though this project took us forever, did involve relief sculpting, Sharpie coloring, painting and weaving (oh, and puppy paint, ha!) all while learning the history of the Metepec suns of Mexico. What's your fave long-winded art project? Please tell me I'm not the only one with million-year art projects, y'all!
 photo signature_zpsd10b3273.png
Read more »

Tuesday, October 28, 2014

In the Art Room: Second Grade Collage Landscapes Inspired by Chilean Arpilleras

Hey, guys! I'm excited to share with y'all the finished product of many an art class: Second Grade's Landscape Collages!
Here's some things we learned along the way (with more detail in a hot minute):

* How to create textured papers. I borrowed heavily from my buddy Laura's blog Painted Paper because Laura is my art teacher super hero. Suriously. Her students work is amazin'. 

* How to create a landscape with a fore-, middle- and background. 

* How to create an origami house. Some kids got really into this, creating multiple houses for their landscape.

* How to embellish with puffy paint...selectively. Oh, lawd, y'all. You've heard of the book If You Give a Mouse a Cookie, right? Well, If You Give a Second Grader Puffy Paint was not about to be the sequel in my art room. I was the Puffy Paint Nazi. One false move and it was NO PUFFY PAINT FOR YOU!
* How to create a whip-stitched boarder. So I thought this would be totes elementary for these guys. Turns out kids don't know how to sew anymore and this was ROCKET SCIENCE. Note to self: Have more stitched projects...for the sub to do (haha, I kid. Kinda.)
Now that you know the gist, lemme back up a lil bit and give you the full story. The lessons started with an intro to Mexico and Latin America. You can find my prezi (remember my prezi addiction?) here

After that prezi and a quick chat, we spent our first 30 minutes (my first and second grade have 30 minutes of art, twice every six days) creating textured paper with a sponge and tan paint. We chatted about the texture of the Andes mountains in Chile and used that as our inspiration. 

The following 30 minutes were spent learning more painting techniques. We learned how to use cardboard to print flowers or plants, use a texture comb to create textured papers (see the sun below) and how to create a plaid pattern with a dry brush technique. Yes, all that in 30. Sometimes I question my sanity.
The following class, we chatted about arpilleras. You can see my prezi on those lovelies here. After that, we began tearing our textured papers and gluing them to a 12" X 12" construction paper background of our choosing. The key to doing this without having gaps in the landscape is to have the kids begin with the background piece and proceed gluing pieces toward the foreground.  
The next art class, I had the kids immediately grab a piece of origami paper as they entered and meet me on the floor for a origami house demo on the document camera. Before I had a doc camera, I would have simply done an origami demo on a GIANT sheet of paper so they could see all of the steps. With the cam, we all worked together. If time allowed, the kids created more houses or used thin Sharpies to decorate their homes. Initials were written on the back and these wee ones were saved for the following art class.
The next day, I told the kids that they had four goals to reach BEFORE they entered Puffy Paint Town: glue houses to landscape keeping perspective in mind (or not), add clouds/stars/whateverness to the sky, create a sun or moon and add their name at the bottom. If all of these goals were met, they could begin to add puffy paint in dots only on their land. 
I actually have a couple of these beauties that I've found at the thrift store over the years. I love having the real thing to share with the kids instead of just a photo from the 'net. 

Many of the kids didn't reach their goals all in 30 minutes so they needed an extra day to puffy paint. The deal with puffy paint is that it has this habit of sneezing all over art work. So I had the kids use a piece of practice paper to practice dot making before doing it on their masterpiece. The deal with kids is that they get carried away on their practice paper (really? You needed to fill the whole paper with dots? Because now the bottle is empty, dude.) so I started to limit them to 3 practice dots. 

Next up was the stitching. Oh boy. I did go ahead and hole punch the sides of their artwork for them prior to art class. Hate me if you wanna but I just didn't want to spend an additional 30 minutes watching the kids struggle and possibly tear their work as they punched through (sometimes) 3 pieces of construction paper. Added bonus: I now have super big muscles in the right hand. Just what I've always wanted!
Once the stitching was complete, so was the masterpiece! I absolutely love how these beauties turned out and the kids are just as thrilled. I decided to hang them in the hall by paper clipping them together because it's my new fave way to display
Speaking of faves, collage landscapes are also my favorite means of teaching about landscapes. For more lessons, you can check out these Collaged Parisian Pictures, Egyptian Landscape Pieces,
and these Tube Castle Landscapes. What's your fave landscape lesson? I needs to know! Until next time, y'all, use that puffy paint the way your art teacher done showed ya!

 photo signature_zpsd10b3273.png
Read more »